
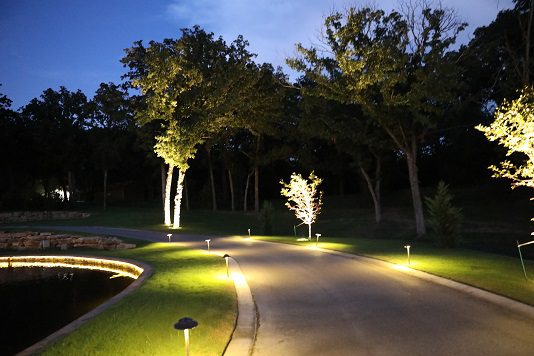
Landscape lighting can completely transform a home after dark.
The right lighting can make a mature tree look spectacular, bring stone and brick to life, create a welcoming path to your front door, and turn a backyard patio into a space you want to use all evening.
But landscape lighting can also go wrong surprisingly quickly.
A fixture that’s too bright can create glare. Poorly spaced path lights can turn a sidewalk into an airport runway. The wrong beam spread can overwhelm a small feature—or barely illuminate a large one.
The secret isn’t simply adding more lights.
It’s knowing what to light, how to light it, and when to leave something in the dark.
Here are some of the biggest do’s and don’ts of professional landscape lighting.
DO: Decide What Deserves Attention
Before placing a single fixture, decide what you actually want to see after sunset.
Look around your property during the day.
Maybe you have:
- Beautiful stone or brickwork
- Mature trees
- Architectural columns
- An inviting front entrance
- Interesting rooflines
- A winding walkway
- A fountain or water feature
- A backyard patio or outdoor kitchen
Those are potential focal points.
Professional landscape lighting isn’t about illuminating every square foot of your property.
It’s about deciding which features deserve attention and using light to draw your eye toward them.
DON’T: Light Everything
It sounds strange coming from a landscape lighting company, but some darkness is a good thing.
If your house, trees, lawn, driveway, flower beds, and walkways are all illuminated at the same intensity, nothing stands out.
Contrast creates drama.
A beautifully illuminated tree looks more impressive against a darker background. Architectural stone becomes more interesting when light and shadow reveal its texture.
Darkness isn’t something professional lighting needs to eliminate.
It’s part of the design.
DO: Use Uplighting to Make a Statement
Uplighting is one of the most effective ways to showcase architectural and landscape features.
Fixtures are positioned near ground level and directed upward toward features such as:
- Mature trees
- Columns
- Stonework
- Architectural peaks
- Entryways
- Tall landscaping
But placement matters.
Moving a fixture closer, farther away, or changing its angle can dramatically alter the finished appearance.
A fixture positioned too close to the feature may shorten the beam and create a harsh effect. Moving it farther away can allow the light to travel and reveal more of the feature.
A few inches can sometimes make a surprisingly big difference.
DON’T: Use the Same Beam for Everything
Imagine trying to illuminate a 30-foot oak tree and a narrow stone column with exactly the same light.
One of them probably isn’t going to look right.
Beam spread should complement the size and shape of the feature.
A narrow beam can emphasize height on a column, slender tree, or architectural detail.
A wider beam may be needed to illuminate a large tree canopy or broader section of architecture.
The goal is simple:
Fit the light to the feature—not the feature to the light.
DO: Use Grazing to Bring Texture to Life
Stone and brick can look beautiful during the day but almost disappear after sunset.
Grazing can change that.
With this technique, fixtures are positioned relatively close to a textured surface so light travels across it at an angle.
That creates highlights and shadows that reveal texture.
Suddenly, the rough surface of stone, the pattern of brick, or another architectural detail becomes part of the nighttime design.
It’s one of those effects that demonstrates why landscape lighting isn’t just about brightness.
Sometimes we’re actually designing with shadows.
DON’T: Wash Away Beautiful Texture
There’s a difference between grazing a wall and washing a wall.
Grazing emphasizes texture and shadows.
Wall washing creates a softer, more uniform layer of illumination.
Both can be beautiful—but they aren’t interchangeable.
Using too much light on textured stone or brick can flatten the surface visually and erase the shadows that made it interesting in the first place.
The technique should match what you’re trying to accomplish.
DO: Use Wall Washing When You Want a Softer Look
Not every surface needs drama.
Sometimes a wall simply needs a soft, even glow.
Wall washing works well when you want broader illumination across a facade, wall, or row of landscaping without emphasizing every texture.
The light source is generally positioned farther from the surface so the beam can spread more evenly.
When it’s done correctly, you notice the overall glow rather than individual bright spots.
DON’T: Create Hot Spots
A bright circle of light surrounded by darkness usually isn’t the look we’re after.
Hot spots often happen when a fixture is too close to a surface, too bright, or has the wrong beam spread.
Professional lighting should transition naturally.
You want your eye to notice the feature—not immediately identify exactly where every beam begins and ends.
DO: Use Accent Lighting to Create Focal Points
Some features deserve a little extra attention.
A specimen tree.
A sculpture.
A flag.
A fountain.
A distinctive architectural feature.
Accent lighting lets those features become nighttime focal points.
The brightness, beam spread, and fixture position can all be adjusted depending on how dramatic or subtle you want the effect to be.
DON’T: Overpower a Small Feature
More light doesn’t automatically make something look better.
A small ornamental tree illuminated with an extremely wide, bright beam can get lost in the light surrounding it.
Sometimes a tighter beam and lower intensity make the feature stand out much more effectively.
This is where restraint becomes an important part of landscape lighting design.
DO: Experiment With Silhouettes and Shadows
Not every feature needs to be illuminated from the front.
Sometimes the more interesting effect happens behind it.
With silhouette lighting, a fixture illuminates the surface behind a tree, plant, or decorative feature. The object itself remains darker, creating a distinctive outline against the illuminated background.
Shadowing does something different: the fixture illuminates the object from the front so its shadow is projected onto the surface behind it.
Both techniques use something homeowners don’t always associate with landscape lighting:
darkness as a design element.
DON’T: Use Special Effects Everywhere
Silhouetting and shadowing can be dramatic.
That’s exactly why they should be used selectively.
If every part of the landscape is competing for attention, the design becomes busy.
A special effect is most effective when it actually feels special.
DO: Use Downlighting Where Light Is Needed From Above
Not every landscape light needs to originate at ground level.
Downlighting can provide useful illumination around:
- Patios
- Walkways
- Outdoor living areas
- Gardens
- Driveways
- Entrances
Fixtures are mounted above the area and aimed downward, allowing the light to cover the space from a more natural direction.
Downlighting can be especially useful when you want illumination without adding more visible fixtures at ground level.
DO: Let Moonlighting Feel Like Moonlight
Moonlighting is a special type of downlighting—and one of the most beautiful effects in landscape lighting.
Fixtures are mounted high in mature trees and directed downward through the branches.
Leaves and branches break up the light and create soft patterns across the lawn, driveway, walkway, or patio below.
The result can resemble natural moonlight filtering through the trees.
The key word is subtle.
DON’T: Make Moonlighting Too Bright
If your “moonlight” looks like a stadium light mounted in a tree, something has gone wrong.
Moonlighting works because it’s soft.
Too much output destroys the natural effect and can create unnecessary glare.
This is another place where less light can produce a better result.
DO: Make Path Lighting Part of the Landscape
Path lights serve an important practical purpose by improving visibility along walkways.
But they can also contribute to the beauty of the landscape.
Fixtures can be incorporated among plants and landscape beds so they feel like part of the overall design.
Alternating placement along the sides of a walkway can provide overlapping areas of illumination without making the fixtures look overly regimented.
DON’T: Build an Airport Runway
You’ve probably seen it.
Path light. Path light. Path light. Path light.
Perfectly spaced on both sides of a sidewalk all the way to the front door.
It certainly lights the walkway.
But it may not be the look you want for your home.
Path lights don’t need to be lined up like soldiers. Proper spacing and thoughtful placement can provide plenty of visibility while creating a much more natural appearance.
Light the walkway—not the fixture layout.
DO: Control Glare
One of the most important questions in landscape lighting is:
Where will people be looking from?
A fixture might beautifully illuminate a tree from one angle while shining directly into someone’s eyes from another.
Consider the view from:
- The street
- The driveway
- The front entrance
- Inside the home
- The patio
- Outdoor seating areas
- Neighboring properties
Fixture position, aiming, shielding, and brightness can all help keep the light where it belongs.
You should notice the effect before you notice the source.
DON’T: Assume Brighter Means Better
This may be the biggest landscape lighting mistake of all.
More lumens don’t automatically create better lighting.
Too much brightness can produce glare, flatten architectural details, wash out landscaping, and destroy the contrast that gives a lighting design depth.
Beautiful landscape lighting isn’t about producing the maximum amount of light.
It’s about using exactly as much as the property needs.
DO: Treat Water Differently
Pools, fountains, ponds, and other water features create unique lighting opportunities.
Underwater lighting can reveal movement, reflections, and textures that completely disappear after sunset.
But fixtures used underwater must be specifically designed and rated for that environment.
Placement is also important because poorly aimed fixtures can create uncomfortable glare and reflections across the water.
When designed correctly, water can become one of the most dramatic elements of a nighttime landscape.
DON’T: Forget the Technical Side of the System
Everything we’ve discussed so far affects what you see.
But a professional landscape lighting system also depends on things you generally don’t see.
That includes:
- Proper transformer sizing
- Correct wire gauge
- Voltage management
- Quality connections
- Appropriate fixture ratings
- Timers and controls
- Quality LED components
- Planning for future expansion
- Maintenance and serviceability
Beautiful fixture placement won’t compensate for a poorly designed system behind the scenes.
Both sides matter.
The Biggest DO: Design the Property as a Whole
One of the easiest mistakes to make is treating every fixture as an individual decision.
A light on this tree.
Another by the sidewalk.
One on the corner of the house.
Another beside the driveway.
Professional landscape lighting takes a different approach.
We step back and ask:
How should the entire property look when all of these lights are on together?
Where should your eye go first?
Where should it go next?
Which areas should be brighter?
Which should be softer?
Where do we need functional light?
And where should we leave some darkness?
That’s when individual fixtures stop looking like individual fixtures—and start becoming a complete lighting design.
Professional Landscape Lighting in Tulsa and Northeast Oklahoma
At Trinity 918 Designs, we’ve been designing and installing professional outdoor lighting for more than 25 years.
We provide custom landscape lighting design, professional installation, LED conversions, repairs, and service for homes and businesses throughout Tulsa and Northeast Oklahoma.
We don’t believe great landscape lighting comes from simply adding more fixtures.
It comes from putting the right light in the right place.
Ready to See Your Home in a Whole New Light?
Your home already has features worth showing off.
Let Trinity 918 Designs reveal them after dark.
We’ll create a custom landscape lighting design around your home’s architecture, landscaping, outdoor living spaces, and the way you use your property.
Visit our Landscape Lighting Services page to learn more and schedule your free consultation:
https://www.superbrightleds.com/blog/the-dos-and-donts-of-landscape-lighting-techniques.html